 Hermit's Free Library MS-Windows
 Hermit's Free Library MS-Windows
This article describes how to customize file lists in Windows Explorer and Save As and Open dialog boxes, including the view, inclusion of optional information fields, size and order of fields, and sorting by fields. It also explains how to change the default view for folders in Windows Explorer.
Although Save As and Open dialog boxes appear to be a part of the application programs we use, they are not. In fact, they are brought to us by Windows itself. They are actually Windows Explorer in a slightly different form.
The file lists in Windows Explorer and Save As and Open dialog boxes are highly customizable. Choices include:
To get started, select the view which has the greatest potential for customization, the Details view.
Note: All illustrations shown here are from a Save As dialog box, but as noted above, Save As and Open dialogs are exactly the same as Windows Explorer. Therefore, every detail of the following descriptions is exactly the same in any of the three incarnations of the Windows file management software.
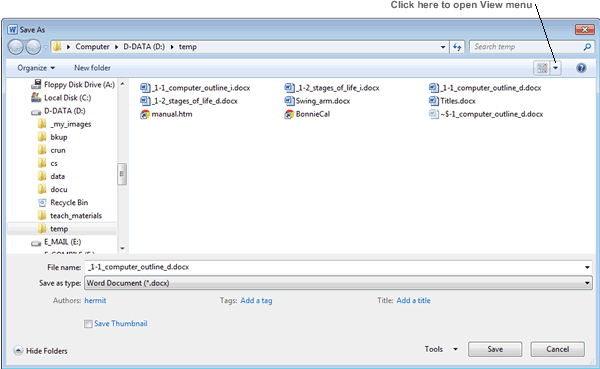
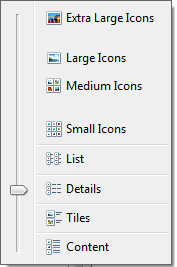
Details view unlocks access to a wealth of file information and choices of how the information is presented. To get the most out of your file lists, begin by opening the View menu and selecting Details view.


View Menu
Select Details
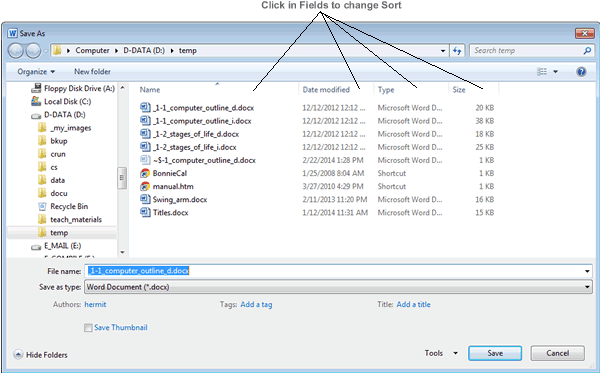
Once you've selected the Details views, the dialog box presents the standard file information fields: name, type, size, and date.
In the Details view you can sort the file list whichever way is most convenient to the task at hand. Simply Left-click in a field to sort the files by that field.
Left-clicking the same field a second time reverses the sort order
from ascending to descending or visa-versa.

Note that the sort field can be identified by the small blue triangle above the name of the field. If the triangle points up, the sort order is ascending (a-z), if down the order is descending.
You can also add fields to the file list. Just as one example, when looking
at a folder of digital photos you could add fields to show
the dimensions in pixels of each photo and what camera and camera model
were used to shoot them.
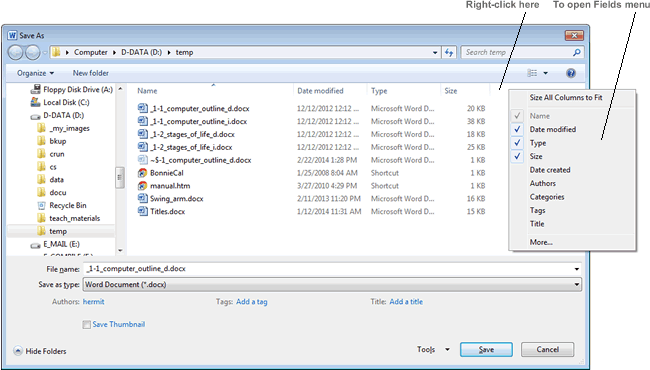
To add fields, Right-click in the empty space just beyond the last field
in the file list. This will open a menu of additional available fields.
Click More to see more fields and check each field you want to appear in the file list.

Note the "More" entry at the bottom of the Fields menu. This provides access to an extensive list (over 250) of additional information fields that you can add to Windows Explorer and Open and Save As dialog boxes.
There are two ways to resize the width of file list fields (to see the complete names of files with very long names, for example). The first is to Left-drag the boundaries between the names of the fields, much as you might do with columns in a spreadsheet. The second is to open the Fields menu and click on Size All Columns to Fit.
If you would prefer that the file info fields appeared in a different order, simply Left-click on the field column heading name and hold down the mouse button while you drag the field to the location you want it to appear in relation to the other fields.
The default file View in most Windows versions is Small Icons. Not a very friendly view because sorted items appear from left-to-right and continue on the next line, making for a lot of eye movement when searching for a particular file.
The columnular display of the Details view is much easier to scan, and as described above, it offers much more information about files. Therefore, for most folders the Details view is a better choice.
Many users make the Details view their default view and then select a different view for folders when doing so makes sense. For example, the Large Icons view makes sense for a folder containing photos when you want to select them based on their content.
Here's how you can set any view as the default in Windows Explorer:
Now folders (which have not been customized) will open to the view you selected by default.