 Hermit's Free Library MS-Word
 Hermit's Free Library MS-Word
A description of styles and a list of their many benefits followed by explanations of how to apply styles, modify styles, and create new ones. Shows how styles and templates are used to set default formatting like typeface, etc. Includes a link to an exercise which covers all aspects of working with styles and explains how to set up Word options to make styles work smoothly.
A surprising number of users are unaware of, or under-utilize MS-Word's Styles. Styles is one of the most useful features of every word processing program worth its salt.
If you don't use Styles, or want to know more about them, read on!
A style is a saved and named collection of character and paragraph formats which can be applied to text as a group.
There are actually five types of styles in MS-Word:
This article talks about the first and most common style category: paragraph and character styles.
All text in word processing documents uses a style. If no particular style is chosen by the user, the default style is applied automatically. The default style in MS-Word is named Normal.
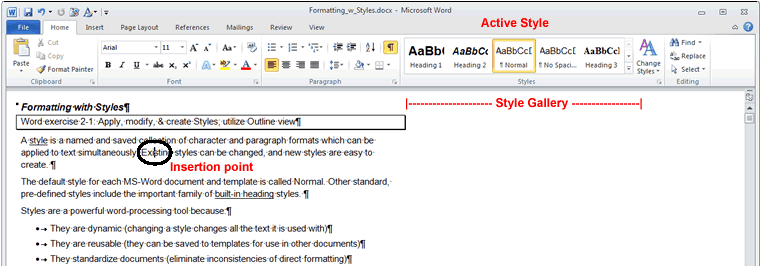
It's easy to see what style is applied to any document text: simply position the insertion point in the text and look at the style gallery (see illustrations below). The button corresponding to the active style will be highlighted.
There are many, advantages to using Styles. Most of them boil down to these characteristics:
Suppose there were specific paragraphs in a document that you wanted to format like this:
Applying the formats with direct formatting is six times as much work as it takes to apply them using one style.
When a style is modified, every place that style was used changes automatically, without any action on your part. So, if you decide to change one of a style's formats, you just edit the style and when you save it the format changes everywhere the style was used.
If you want to use a style in other documents, just add it to a template with a click and it will appear in the style gallery of all documents (new and old) based on that template.
When used across many documents, styles ensure that formatting is identical everywhere.
Built-in Heading styles tap into the power of features like Outline view and the Headings view of the Find (Search) taskpane. Once your document is organized into sections beneath Headings, you can rapidly re-organize topics visually using the Promote/Demote, and Send Up/Down Outline tools. This method of moving text around makes Cut and Paste look like bear skins and knives.
Applying a style works exactly the way direct formatting does:
That's all there is to it. To make things even easier:
Creating a custom style is as easy as 1-2-3. Oh, ok. 1-2-3-4.
See example in figures below:
Figure 1: Steps 1 - 2 - 3
1) Apply Times Roman, 11pt italics, increased left/right indent,
and hanging indent to model text with direct formatting
2) Right-click model and click "Styles"
3) Click on "Save Selection as New Style"
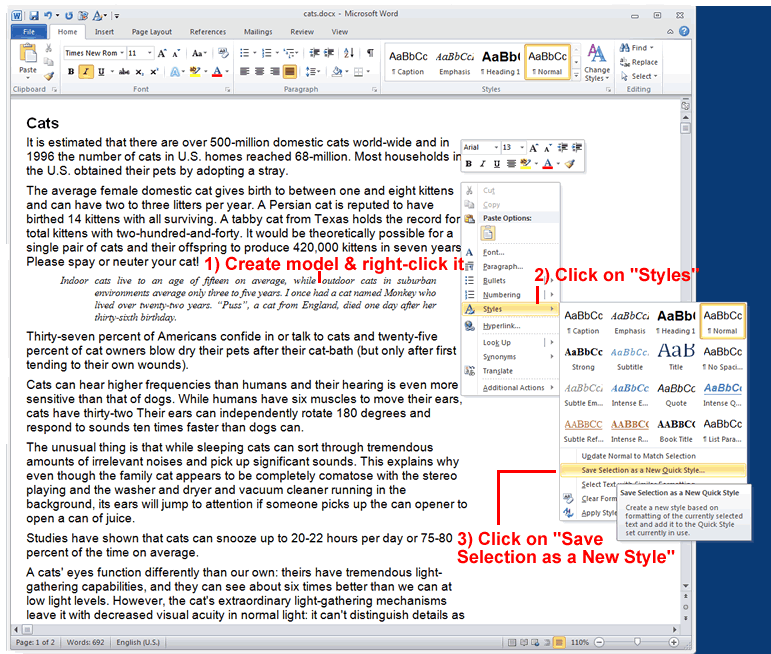
Figure 2: Step 4 Type in name for the new style and click on Ok
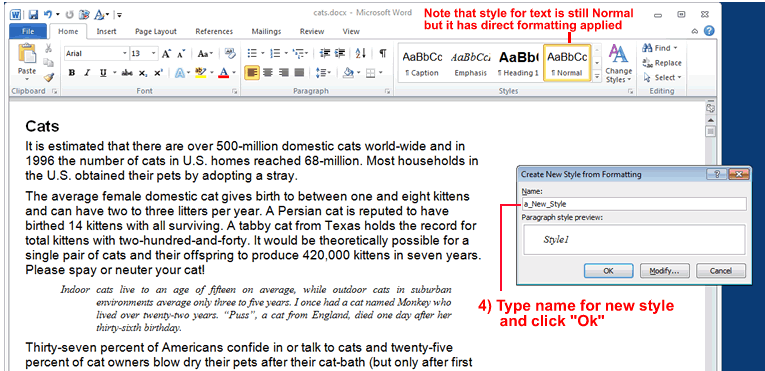
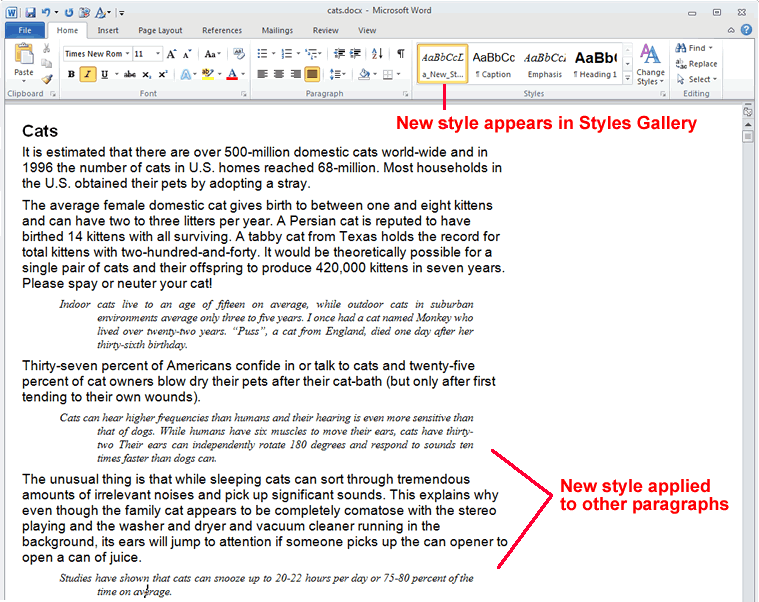
Figure 3: A new Style appears in Style Gallery - apply it to other paragraphs
To modify an existing style, use the same steps to create a new style except:
Step 3
Instead of clicking on "Save Selection as a New Style", click on "Update [name of style] to Match Selection", as shown in the figure at right.
As soon as you update the style, all text formatted with the style is updated to match the changes.
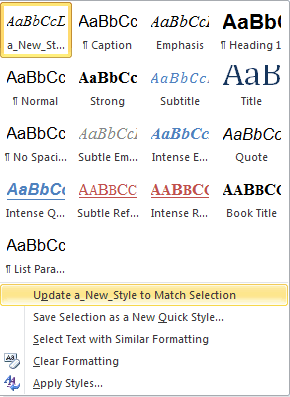
Have you ever wished that every new document you started used a typeface different from the one Microsoft designated as the default? Once you know how to modify a style, you're only one click away from that goal.
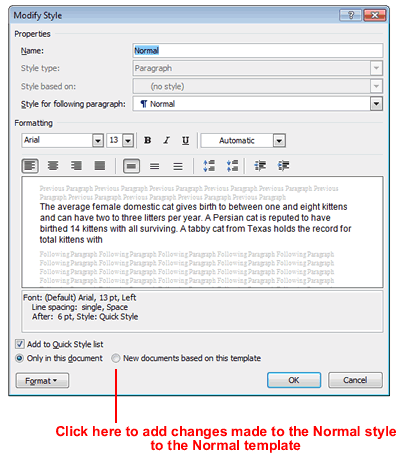
By default, when you add or change a style in a document, the modification is limited to that document.
However, with one extra mouse click you can save the new or modified style to the document template. When you do this, the change becomes the default for all documents based on that template.
Here's how to change the default typeface for all your new documents:
 ) on the Home tab of the Ribbon
 ) in the document
The typeface that you chose becomes the default in all new documents.
To learn more about templates and how to work with them, see Working with Templates.
When you use the built-in heading styles (Heading 1, Heading 2, Heading 3, etc.), to format section headings in a document, you're not only adding formatting, you're organizing the document and giving it structure.
The structure provided by the built-in headings opens the door to the powerful Outline view and it's superb organizational tools: Promote/Demote, Move Up/Move Down.
In an effort to get more users to actually use styles, Microsoft created an option to have Word create a new style each time that you apply some direct formatting.
Its heart was in the right place, but because we will always use some direct formatting here and there on an ad hoc basis, this option ends up cluttering up the Style Gallery with unnecessary and unneeded styles which just make it harder to find the styles we actually use.
If you notice Word adding new styles without you asking it to do so, just turn this option off using either one of these methods:
Method 1
Method 2