BSA WDM20 Ignition Timing Adjustment
By Hans Muller
WDM20 58764
May 2007
Setting the Ignition on your BSA WDM20 Magdyno
- First loosen the Magdyno driving pinion with the special extractor
(fig. 2); do not remove!
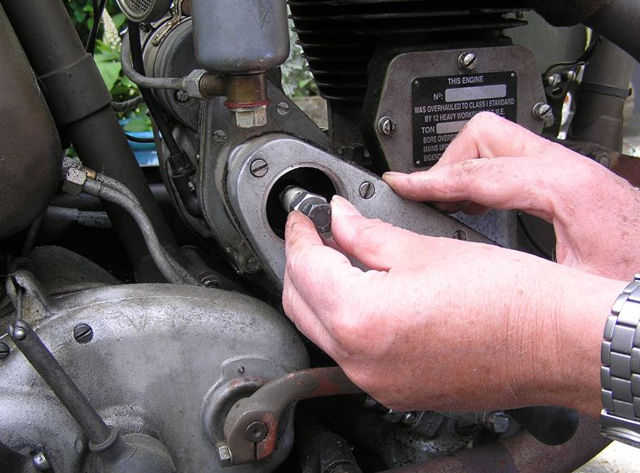
Figure 2 Using the pinion extractor tool. Can be made yourself, but
unless you are an ace with the lathe, I strongly recommend buying one!
The hole in the timing cover is the one used on later models, but I
made this myself; the cap is the same as the chain case inspection cap.
- Remove the spark plug and the small cylinder head timing bolt. Put
the gearbox in 4th gear and let the piston move upwards on the compression
stroke by slowly turning the rear wheel. You have to remove the valve spring
cover to see if you are really on the compression stroke; both valves should
be down, and both tappets should rotate freely.
- Now insert a thin wooden stick (I use a bamboo kebab skewer) and continue
turning slowly the rear wheel until the stick does not go up anymore; you are
now at TDC (Top Dead Centre). Put a mark on the stick, repeat a couple of
times and average, to be sure you are really at TDC !
- Remove the stick and put another mark at 11.1 mm (7/16" for the
metrically-challenged) above the first mark. Use a green (or any other
colour at hand) felt pen to mark that 11.1 mm section. (Fig. 3)
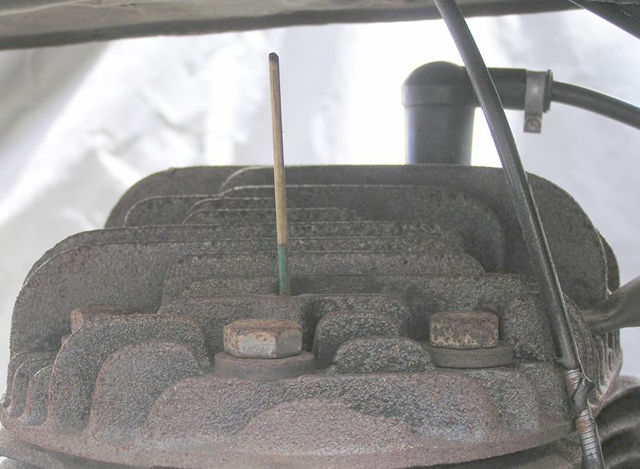
Figure 3. The skewer with the piston in TDC position.
- Put the stick in the cylinder and turn the rear wheel backwards, until
the upper mark is flush with the cylinder head; the piston is now at the
fully advanced position.
- In the mean time you have made a piston stop that can be threaded into
the cylinder head timing bolt hole, using materials from the box in your
workshop with
things-that-really-should-have-been-thrown-away-a-long-time-ago-but-
that-you-kept-in-case-of-need. Adjust the stop so that it touches the
piston at the fully advanced position (11.1 mm before TDC). The thread
in the timing bolt hole is 1/4"x25 CEI; mine was knackered beyond
recognition so I re-threaded to metric. (Fig. 4)
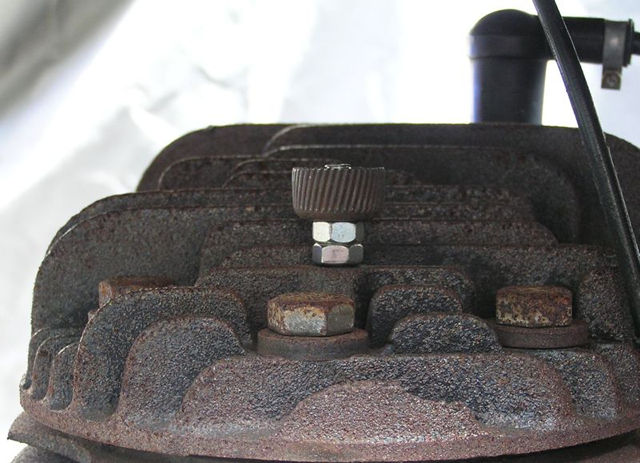
Figure 4. The piston stop tool in position; now the piston is in
fully advanced position.
- My Magdyno has the advance cable on the left side (cable slack
when fully advanced) which is not original WW2, but strongly recommended!
(Conversion can be done by a good specialist) If the cable breaks, you are
in the fully advanced (= riding) position, and you only have a slight
problem when starting (risk of kickback). But try to drive in retarded
mode, and your exhaust valve will soon burn away.
- Now, carefully pull the contact point with the little hook, and insert
a strip of cigarette paper between the points. Slowly turn the contact
breaker assembly in its direction of rotation until the paper comes loose.
You will have to do this a couple of times to get the `feel' of it. (Fig. 5).
When fully open, the contact points gap should not exceed 0.30 mm (0.012");
adjust if necessary.
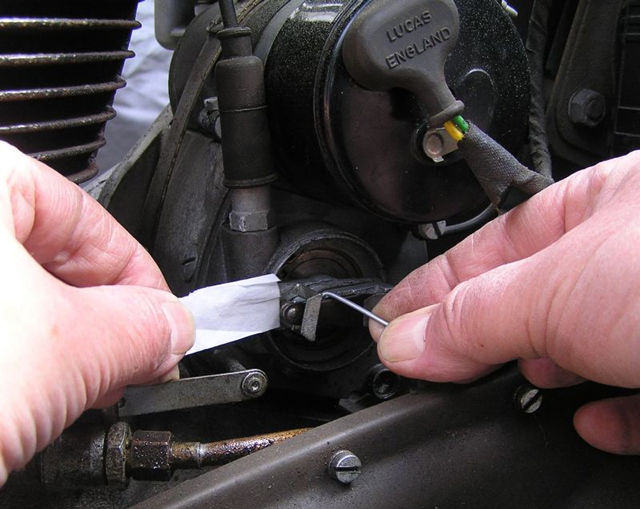
Figure 5. Inserting the rolling paper between the points.
- Give a tap on the magneto driving pinion to secure it on the taper;
this can best be done using the extractor, screwed in with the bolt fully
retracted, giving it a smart blow, and tighten the nut. . The internal and
external tapers should be reasonably grease-and oil free, otherwise your
ignition will get out of pace rapidly; remember, there is no key and keyway
to prevent the pinion turning!
- To check, remove the piston stop, put in that kebab skewer (no green
should show) and set the advance lever in fully retarded position; slowly
turn the rear wheel until the paper strip comes loose. The green mark should
now be fully visible.
That's it!
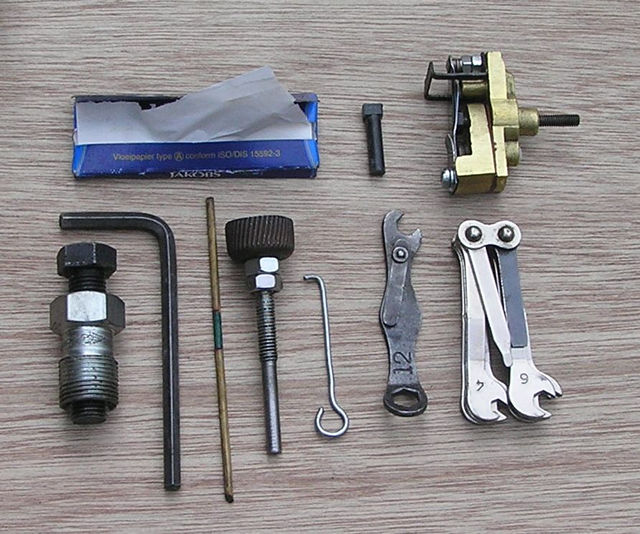
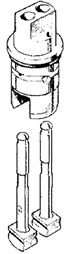
Figure 1. A handy set of tools I alway carry with me. You can see
the extractor tool, the hex key wrench for my modified cylinder head
timing bolt, the kebab skewer with the green marking (note that I put
it upside down on the photo; the shortest part should go down in the
cylinder, the other end had been cut askew to prevent putting that
part down in the cylinder!), the home-made piston stop, the small
hook to pull the contact points slightly apart for the paper, the
Magdyno spanner, additional magneto spanner set, a package of cigarette rolling
papers (will last you several lifetimes) and a reserve contact
breaker set.