Before doing anything, make the gearbox fixture, as described in several publications: just two pieces of angle iron bolted on a piece of strong plywood, with two 12.5 mm (1/2") holes 120 mm (4") apart. Worth the trouble!
Another simple, helpful tool; adjusting the different parts of the gearbox is a bit difficult, to say the least, especially when you had to take it completely apart, including the gear control rod. Re-assembling of that crucial part is a tedious operation.
If you realize that under normal running conditions the gearbox main shaft always turns it is clear that while adjusting it on the workbench it should also turn! And that is easy when you attach a crank to the main shaft; you can now shift gears like under actual operation. A discarded bicycle crank would be suitable.
And instead of the gear change lever, use a 6" grip wrench; also handy in your toolkit, especially when you loose that gear change lever a hundred miles away from your favourite parts supplier.
(Remember: "All parts falling off this motorcycle are of the finest British workmanship").
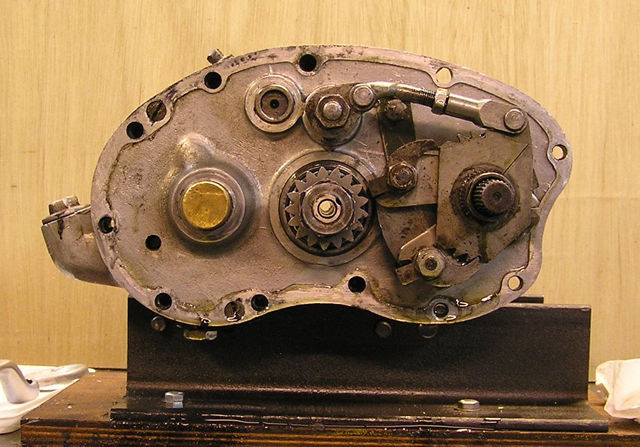
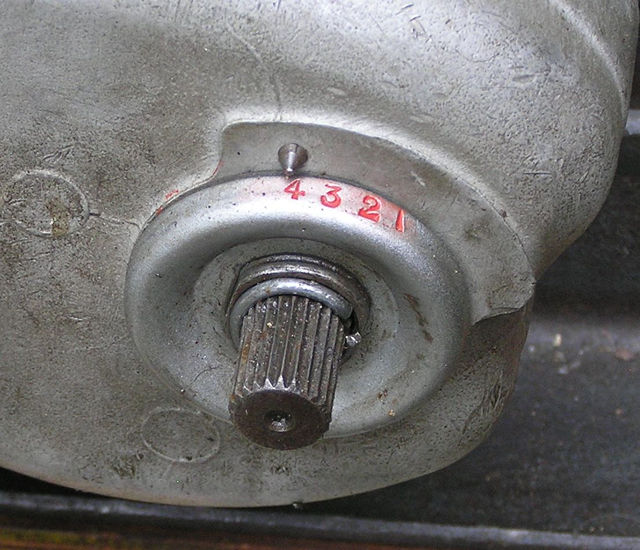
This is well described in the "Motor Cycling" articles: remove the circlips in front and behind the gear position indicator (Gearbox figure 1), then the seven bolts and one (thin) nut on the front, and the 3 bolts plus one nut on the rearside (Gearbox figure 3). My gearbox - reconditioned in a REME workshop - had four 1/4" bolts, instead of the stud + nut. (See below for another useful modification).
Now the cover comes off, and it is time to mop up the gearbox oil that drips on your workbench and floor, so perhaps it is a better idea to drain the gearbox beforehand, DAMHIK.....
A crucial operation; it will make the difference between blood, sweat, toil and tears, and happy riding and smooth shifting.
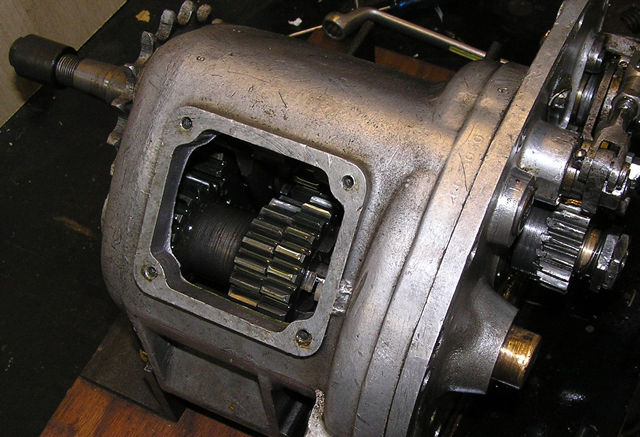
First, remove the gearbox inspection cover (Gearbox figure 9), mount the gear change lever, or the grip wrench, (Gearbox figures 1 and 3). Be sure that the `Ratchet lever sleeve clip ring' (part 15-4219) is in place; it prevents the top and bottom pawls to disengage.
Now,
Very often, there will be a false neutral between 3rd and 4th but that can be cured (most of the time....)
Now go back to first, by going through 3rd, 2nd and finally 1st. To get into neutral, lift slightly, and the gears should oblige.
If everything works as described: CONGRATULATIONS ! You just won
the lottery. If not, you will have to adjust the gear control rod. (15-4253).
Loosen the locknut, remove the split pin with a needle-nose plier and pull
out the rod pin (Gearbox figure 6).
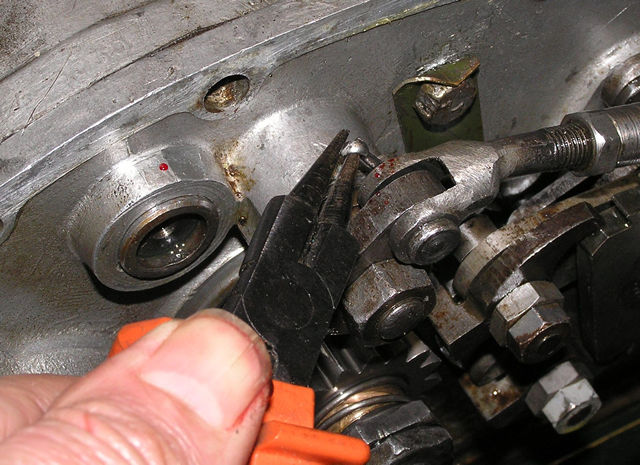
Gearbox figure 6
You can now adjust the length of the gear control rod, doing one turn a time ! And then repeat steps 1 - 4, until the gears engage correctly.
False neutral and irregular gear changing can also be attributed to worn gearbox top and bottom pawls (parts 15-4141 and 15-4142).
If you are satisfied, you can re-assemble the gearbox; of course, you didn't forget to tighten the gear control rod lock nut, and insert the split pin....
There should be a paper gasket behind the cover; you can order one
from your friendly (and often expensive) dealer, but you can also cut one
yourself (Gearbox figure 7).
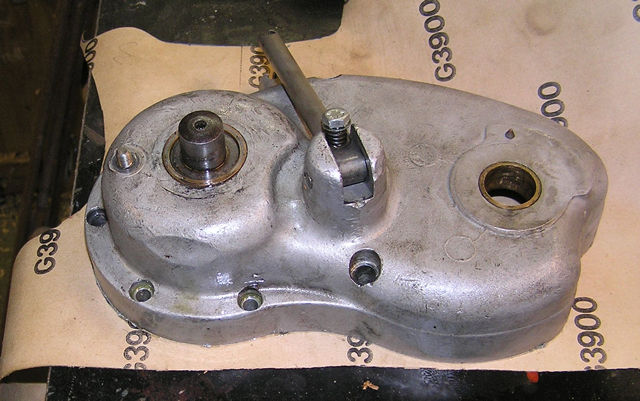
Gearbox figure 7
And to prevent oil from the gearbox to enter the clutch through the mainshaft hole, there should be a felt washer around the clutch rod; outside diameter not critical, I use 18 mm, but the thickness should be not less than 4 mm.
If you think you can replace the gasket between the inner and outer cover by using liquid gasket like Hylomar or silicone paste: forget it, you absolutely need the right gasket there, or make one yourself from not-too-thin gasket paper; DAMHIK!
Otherwise, changing gears will be next to impossible due to binding of critical parts. And in the worst case you will only notice when the gearbox is in place.
De-grease the cover, smear lightly with silicone paste and glue the gasket to the cover. Then lightly smear the gearbox side with grease, and the paper gasket on the cover with silicone paste, and screw the parts together. If you have to remove the cover again, the gasket will remain intact. And don't forget to add gearbox oil .....
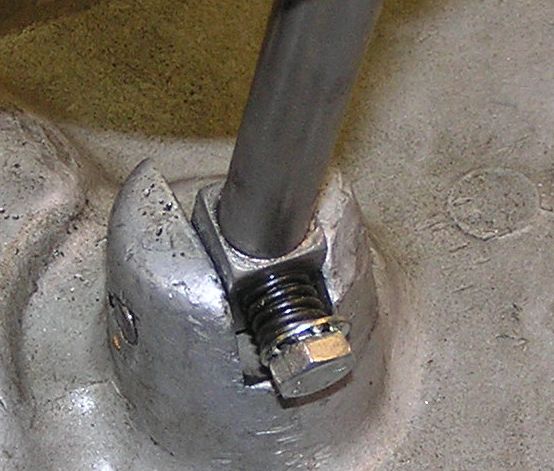
After putting the gearbox back in the frame, you can attach the clutch cable to the operating lever; don't forget that small 5/16" steel ball between the clutch push rod (the original measures 1/4" but 6 mm will do fine) and the clutch operating lever. Clutch adjustment must be done with a small bolt and a locknut, but I replaced that with a small, strong spring and a serrated washer (Gearbox figure 8).
If you have to remove the front cover only to replace the kickstart spring, or to adjust the gear control rod, this is VERY difficult to do without removing the whole gearbox from the bike. This involves the removing of the primary cover and chain, the clutch, inner primary cover and the gearbox bolts. The problem lies in the four bolts that are only accessible from the rear of the gearbox, there is hardly any place to get a spanner there, let alone turn it to remove the four bolts.
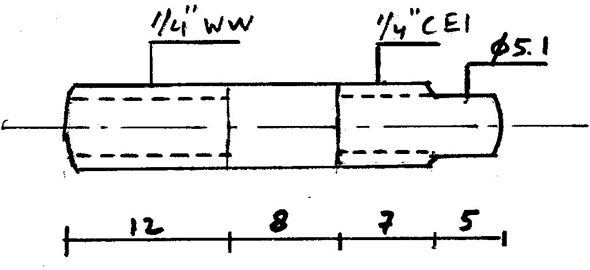
I replaced the bolts on my spare gearbox by 4 studs with 1/4"WW thread on one side and 1/4"x26tpi (Cycle thread) on the other end; on this side I turned a short cylindrical section, to more easily engage the nut.
Then I made nuts from 13mm hex rod, and with 1/4"x26tpi thread. Now I can unscrew the nuts with a small, thin metric ratchet spanner (I could not find a suitable inch-size spanner).